Showing posts with label crafts. Show all posts

7.15.2013

Cereal Box Letters

In my last post you saw that I made these letters out of cereal boxes that I found in my pantry- here's a simple tutorial to make these by yourself!


You'll Need
  • A Cereal Box
  • Hot Glue Gun
  • Scissors 
  • Paint
  • Painters Tape (for the chevron)
  • Toothpick (for the dotted sides)


1. Print out a guide- that you will use to trace on to your cereal box. Make it a desired font and size- I used Century Gothic in size 800- but its up to you if you want the letter to be larger or smaller. Then just cut it out when its printed.

2. Cut your cereal box- so that it is completely flat and make sure that the sides of the cereal box are still in tack. 


3. Trace your cut out letter- onto the OUTSIDE of the cereal box (where its printed with words). Make sure that when you do this you are tracing the letter backwards or you will run into trouble later- you want to do this twice- I did not take a picture of this step but the way you trace it should look something like this-

{You need one K going the right way and one K going backwards}
4. Cut out the letters

5. Using the leftover cereal box- cut equal height cardboard pieces that match up with the sides of letter.  After you make all of the sides you can hot glue them into the right places.


6. Once all pieces are glued on you can carefully glue on the top part of the letter- but be sure to work quickly.


7. Paint your letter however you want. I of course did mine with a chevron pattern on the front using painters tape and on the sides I used three different colors to create a almost paint splattered effect using different sized dots made by toothpicks!
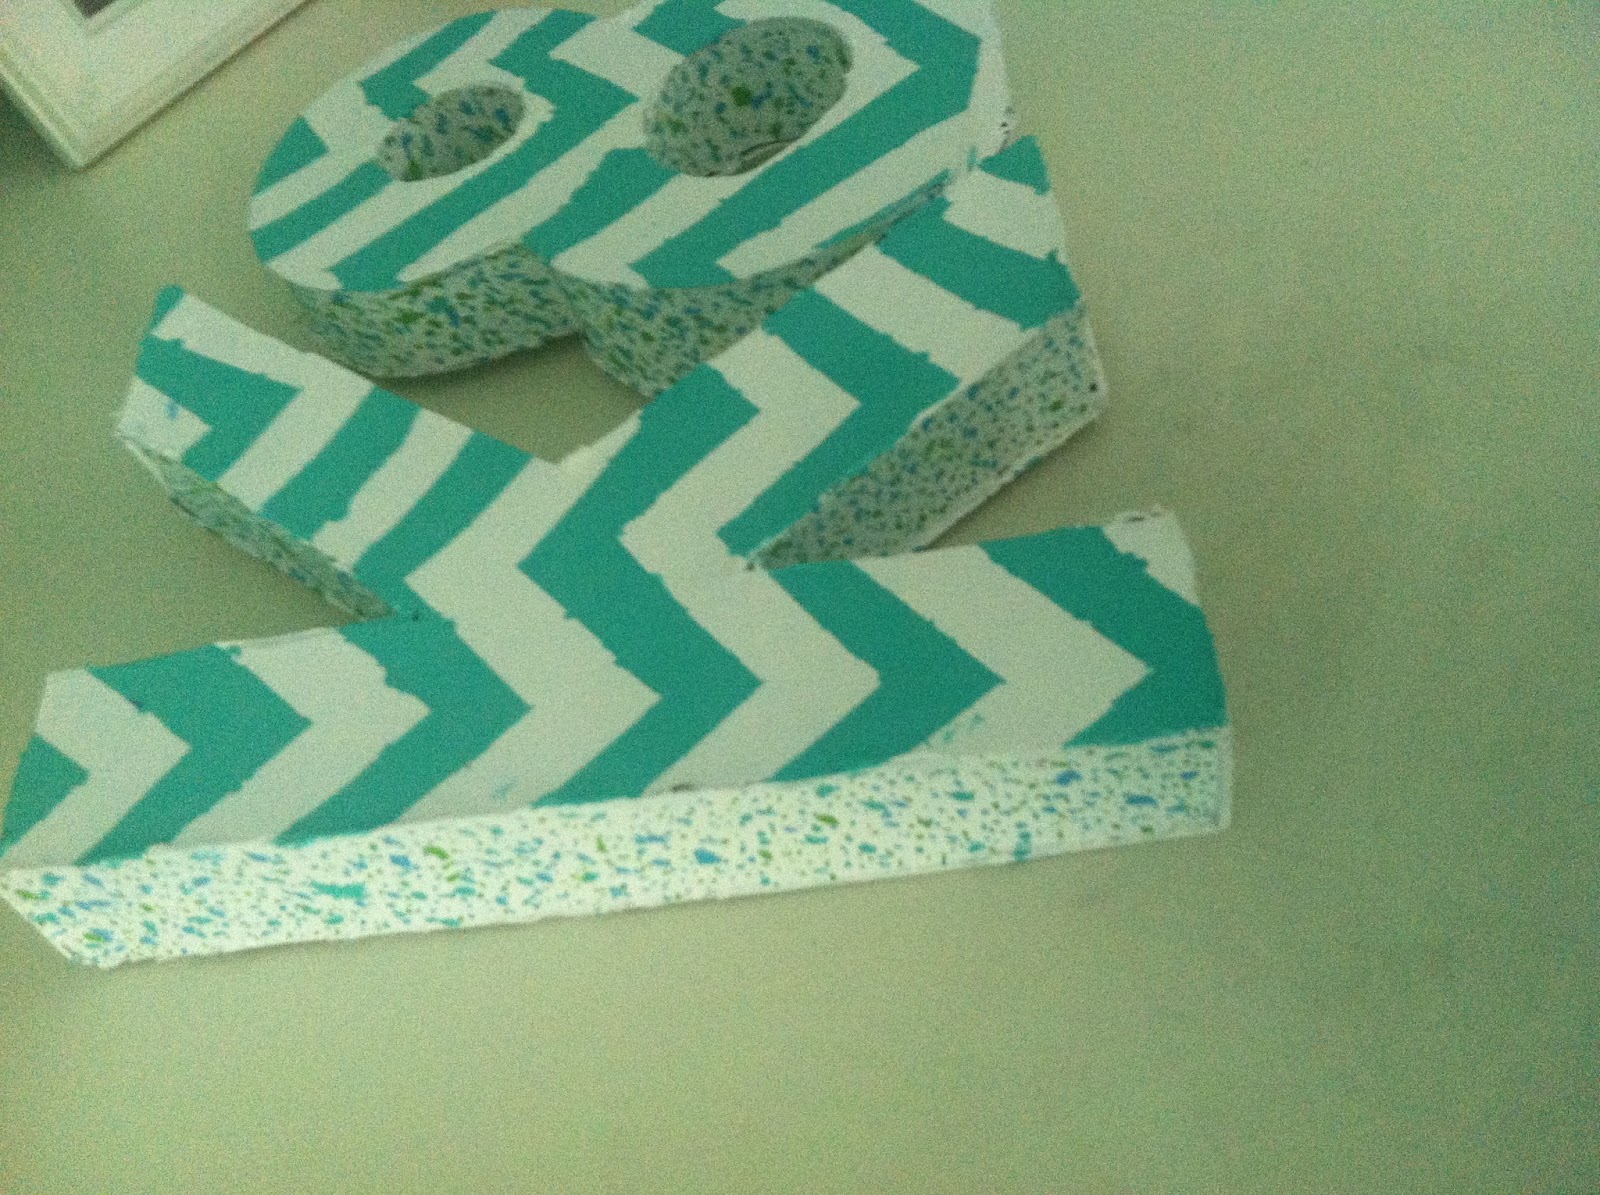

{To show off the sides}

Additional Comments-

  • Since I had two letters - I glued the 8 to the K at a slant 
  • I left the back white and wrote a happy birthday note to the birthday girl!
  • The 8 has a flat bottom so that it stands on its own- just flatten any curved lines on the bottom- U, S, C, B, etc.
  • You can use this it really make anything- letters, shapes, etc. Perfect for a large number for a birthday party decoration
  • Originally I was going to tie balloons to this- but never got a chance to pick balloons up from the store.

Well that's about it- I tried to make this easy to follow but I know it may sound a little confusing- if you have any questions you can just comment of shoot me an email!

7.01.2013

Fourth Of July Galvanized Bucket

This weekend has been a crazy crafting weekend for me! I did one pinterest project and three homemade ones that came straight from my brain. I'm documenting all of them- so let's start with the first one I made.


Like I said we are going to Washington D.C. and staying at some family friend's house. To thank them for being kind enough to let my whole family stay with them we like to bring a gift basket. Well since we will be going for the Fourth what better than an american flag inspired bucket to hold it in.


1. Bucket- This is what you are making! I picked mine up at the local Ace Hardware for 15 dollars- it was the most expensive part of the whole project. I bet you could find these any where for much cheaper- I just wasn't looking that hard.

2. Paint Brush- so you can paint

3. Paint- Red, White, and Blue ('murrica)
                  I didn't have red white and blue paint when I started this project so I thought I would be frugal and add black to the lighter colors- didn't really turn out so I had to make a quick stop to Michael's.

4. Paper Towels- You will see how I used this shortly.

OTHERS- I also used blue painters tape to make the stars and the stripes and star cookie cutters to outline the stars onto the painters tape.


1. First things first- After I bought this tub it needed a serious wash so I took it over to the hose and washed it out.


2. Then after it was all dry I sat down to start to paint. Using the white acrylic paint I started to paint small sections of the the bucket. Then using the paper towels I gently wiped some of the paint- still leaving behind white. I wanted to be able to see some of the shiny silver underneath the white. 

3. I let that dry over night just to be sure it was dry and then I taped off the sections that I wanted using my painters tape. The stripes wrap all the way around until it just to the blue part of the back and the blue part I decided by looking at the bumps that were in the tub already (you can see in the picture above).

4. Now that you have everything taped off you need to make some stars. These stars can be any size you want or can have as many points as you want it doesn't matter! To make my stars I took about six pieces of tape (all about nine inches long) and laid them on to of each other to make a little "sheet". Then using cookie cutters that I have in the shape of stars I traced them on the not sticky side of the tape sheet and cut them out. Then just stuck them onto the bucket where I wanted them to go.


5. Now the easy part! Just paint red over where the stripes are going and blue where the stars are. Wait for that to dry completely before removing the tape to see how awesome the bucket looks.


I love the way that this turned out- it is so adorable. I might just need to make myself one of these. I could totally see this being used at Fourth parties- keeping the drinks cold or holding sparklers or s'more supplies. I just can't get enough of the fourth of July! Hope everyone has a great holiday- anyone have traditions? I would love to hear! I will post more on my crafty weekend soon!

6.22.2013

Sea Glass Vase Tutorial

Recently I have stumbled upon this pin on pinterest a lot. Every time that I saw it there was never a tutorial that went around with it**. So, being the crafty kid that I am, I decided to try this out myself and make my own tutorial for those people who like more direction when they do a project. So after trying it out this is what I came up with-

** If you have the original picture for this pin please email or comment to let me know so that I can give proper credit!


1. Elmer's Glue- Good old fashion glue. We've all used it and we all probably have twenty bottles of it laying around our houses.

2. Vase- This can be any GLASS object that you would like to look like sea glass- anything! I just had this sitting around collecting dust.

3. Food Coloring- You mix this with the glue to get the color that you want. I chose pink- because it's my favorite! 

4. Paint brush- This isn't to specific, just any paint brush you have- although I did find while I did mine that the best to use is a FOAM brush. This one had bristles falling out of it and left behind little hairs.


Dump out your glue- Dump the glue that you will be using into a bowl- pretty simple. A tip would be to use an older bowl that you don't care that much about. Also you do not need to use the whole bottle- depending on what you are going to paint you can just guess. I had a little bit left in one bottle and just used the rest of it.


Mix in Your Food Coloring- Now all you do is add ONE DROP of food coloring into the glue you put into your bowl- one drop is plenty! (You can always add more to get what color you want) Mix everything together until it is evenly together.


Paint it on!- Now all you have to do is evenly coat your glass vase with the glue/ food coloring mixture. Try to not get any streaks- but if you do you can always go over it a second time. I did a couple coats until my vase was too my liking. The tops dried differently then the rest so, I just kept applying the glue onto the vase until it look how I wanted it to. Once you are finished you are going to want to let your glass object dry for a little bit. I let mine dry overnight and it turned out great!


Voila! This turned out pretty sweet. It looks a little orange in lighting in the picture but when you are holding it it is a perfect bubble gum pink. I turned mine into a little nail file holder for a cute way to display my favorite filers! This project was so simple but it really spruced up a boring glass vase. I think it's super cool. 
 If you don't already follow me on Pinterest here! I like to find pins and try to do them myself and document them on this blog! So, until next time, Toodles!

6.08.2013

A Girl and Her Glitter

After being on Pinterest for sometime now, I love searching through different pins and seeing what I could make. Well, I stumbled upon this tutorial on how to make a glitter letter... and I LOVE the way that it looks. There were only 4 short steps so I decided that it looked easy enough for me to do and I thought that I could do my own tutorial to give even more insight on how to make this! Lets start off with what you are going to need-


1) Paint- All you need this for is to paint your letter. Any color or brand will work as long as the paint is acrylic. Since I am going to be glittering my letter in silver I decided to paint my letter grey using this paint.

2) Glitter- Of course we are going to need glitter for our glitter letter! I just picked this can up from my local craft store a couple months ago and it was lying around my house- perfect to use for a glitter letter!

3) Mod Podge- A crafters best friend, this acts as the glue for your glitter to stay on your letter.

4) Wooden Letter- This can be any letter in the world that you want- I chose 'S' because I will be using this in an upcoming project in my room and 'S' stand for Sarah. This can be any shape, size, font, etc. In fact I went back and forth on which S I would choose at the store- they had SO many options!

5) Krylon UV-Resistant Clear Acrylic Coating Spray- The "Secret Weapon" of this project. After spraying your glittery letter with this stuff- no glitter will be getting all up in your stuff. Thats one of the worst parts of using glitter, but this seals it in.


Step 1 Paint Your Letter- using your color of choice paint, paint the entire letter coating all of the sides- including the side you want to be glittered. Depending on the letter you have, you may need to do more than two coats, I did three on my letter just so it was completely covered. 


Step 2 Mod Podge That Baby Up- before you do this step you might want to make sure that your paint is completely dried. You should watch an episode of your favorite show, make yourself a snack, or whatever you do to pass the time. When the time finally comes to cover your letter- smother it. I put it all over the top of the letter. ***Be careful though, the Mod Podge can drip over the edge of your letter and make a glittery mess when you pore on the glitter. Wherever I saw it drip over I just took my finger and wiped it up (you can't be afraid to get a little messy!)


Step 3 Glitter, Glitter, and more Glitter- You heard me! POUR! You don't want to work to slow that all of the Mod Podge dries, but take your time and pour as much glitter as possible. Out of my little bottle I poured a little bit less than half of a bottle, but when i poured all of the excess back in I had a lot more in the bottle. ** Make sure that the surface you are using ok with getting a little bit of glitter on it- if not put down something for me it was wax paper that I could easily lift and put back into the bottle!


Step 4- Sit then Spit- say whaaaa? Sit and Spit? That doesn't make any sense. I know this is what you are probably thinking, but I call this sit and spit because this is the part of the project where I let the Mod Podge and glitter sit for a little while. I let it dry for about 10 minutes before I brought my big trash can over and spit all of the glitter off of that puppy. I shook and shook it until it seemed about right, then I headed out to my backyard grassy areas to get ready for the last step.


SOO MUCH GLITTER!

Step 5- Spray- The very mostest important step. This is where the magic happens baybay! I went outside like I said and brought with me my very purdy glitter letter and the UV-Resistant spray. I carefully put the letter in the grass and squatted over it. The  I spread the letter with the spray, just barely covering it, you don't want to drown it in this stuff just lightly coat it. Another thing is that if you stand to close your letter will look a little dull- so be careful! Now all you have to do is wait 15 minutes for that to dry and you got yourself a sparky sparky letter!


This turned out so cool! I'm so excited to use it in an upcoming project like I said! Again here's where my inspiration came from- this woman has some amazing stuff on her sight! Love, love, love it! In all this project took me about 2 hours- including drying and clean up time. I showed it off to my friend and she already said that she wants me to make her one. I might just have to- it was so easy! Hope you find it just as easy if you make one too. See ya later!
                                          
Pin It button on image hover